

Transactional emails are a critical part of most applications. They are triggered by user actions or system events and are expected to be delivered instantly and reliably.
In this guide, we will walk through how to integrate Sweego’s API to send transactional emails from your application, using practical examples and common use cases.
What Are Transactional Emails?
Transactional emails are automated messages sent in response to specific actions. Unlike marketing emails, they are not promotional and are usually expected by the recipient.
Common examples include:
- Password reset emails
- Account confirmation and email verification
- Order confirmations and invoices
- Security and login alerts
Because these messages are time-sensitive, choosing a reliable email API is essential.
Why Use an API to Send Transactional Emails?
Using an email API allows applications to send emails programmatically with full control over content, timing, and error handling.
With an API-based approach, you can:
- Trigger emails directly from your backend logic
- Handle delivery errors programmatically
- Monitor sending and delivery events
- Scale without changing your application architecture
Sweego provides both an HTTP API and an SMTP relay, making it easy to integrate regardless of your stack.
Prerequisites
Before sending your first transactional email with Sweego, make sure you have:
- A Sweego account. If you don’t have one yet, create an account.
- An API key
- A verified sending domain
Once these steps are completed, you can start sending emails from your application.
Sending a Transactional Email via API
Sweego’s API is language-agnostic and can be used with any backend technology capable of making HTTP requests.
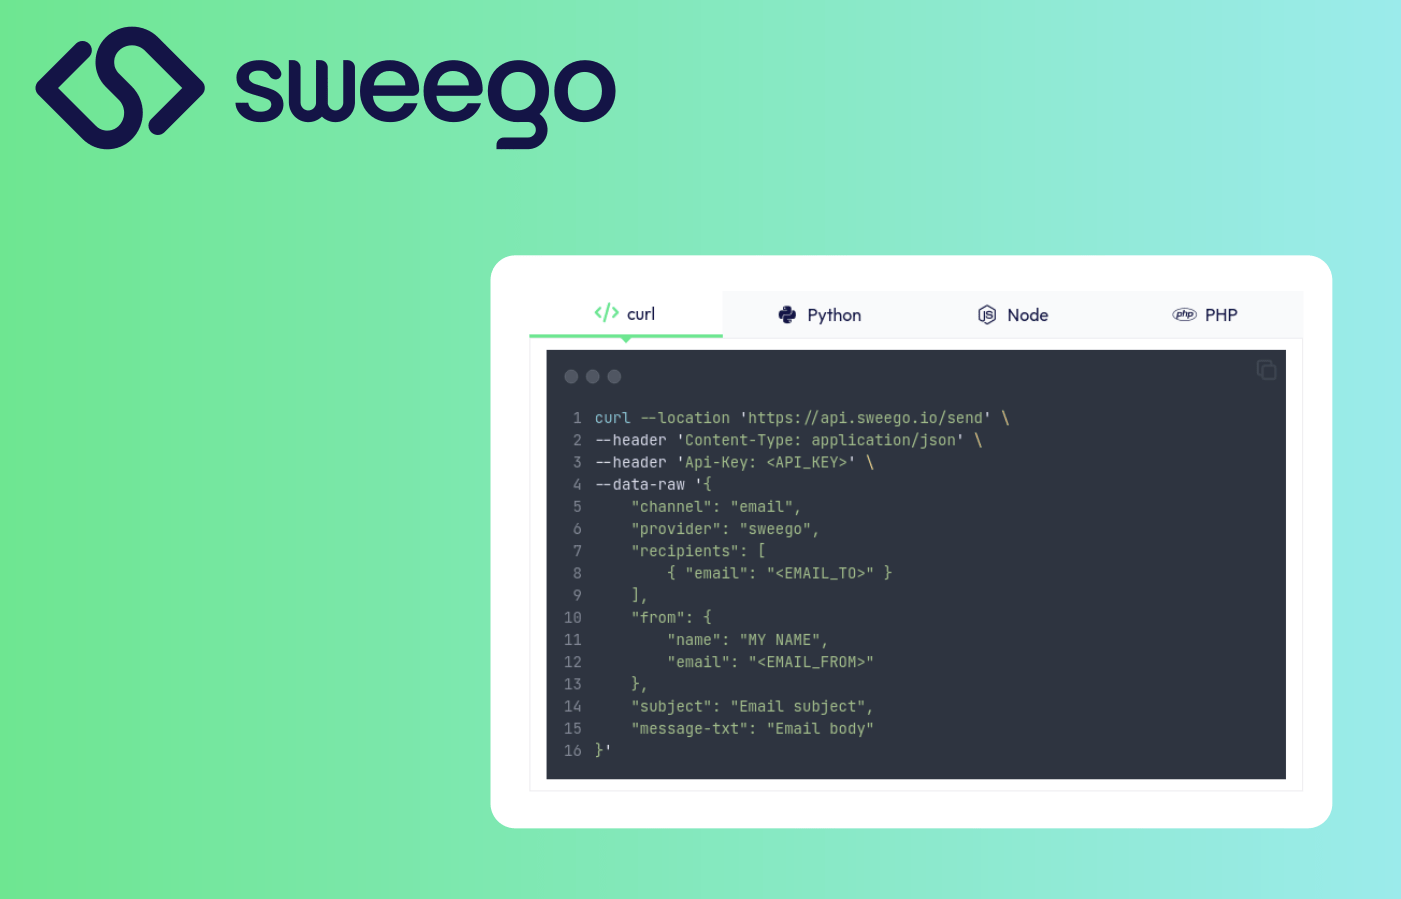
Below are example snippets demonstrating how to send a transactional email using curl, Python, Node.js, and PHP.
curl
Python
Node
PHP
curl --location 'https://api.sweego.io/send' \
--header 'Content-Type: application/json' \
--header 'Api-Key: <API_KEY>' \
--data-raw '{
    "channel": "email",
    "provider": "sweego",
    "recipients": [
        { "email": "<EMAIL_TO>" }
    ],
    "from": {
        "name": "MY NAME",
        "email": "<EMAIL_FROM>"
    },
    "subject": "Email subject",
    "message-txt": "Email body"
}'import requests
api_url = "https://api.sweego.io/send"
api_key = "votre_clé_API"
email_data = {
"channel": "email",
"provider": "sweego",
"recipients": [{"email": "destinataire@example.com"}],
"from": {"name": "MY NAME", "email": "votre_email@example.com"},
"subject": "Email subject",
"message-txt": "Email body"
}
headers = {
"Api-Key": api_key,
"Content-Type": "application/json"
}
response = requests.post(api_url, json=email_data, headers=headers)
if response.status_code == 200:
print("Email envoyé avec succès!")
else:
print(f"Erreur lors de l'envoi de l'email: {response.status_code}")
const fetch = require('node-fetch');

const apiUrl = "https://api.sweego.io/send";
const apiKey = "votre_clé_API";
const emailData = {
    channel: "email",
    provider: "sweego",
    recipients: [{ email: "destinataire@example.com" }],
    from: { name: "MY NAME", email: "votre_email@example.com" },
    subject: "Email subject",
    "message-txt": "Email body"
};

const headers = {
    "Api-Key": apiKey,
    "Content-Type": "application/json"
};

fetch(apiUrl, {
    method: 'POST',
    headers: headers,
    body: JSON.stringify(emailData)
})
.then(response => {
    if (response.ok) {
        return response.json();
    }
    throw new Error(`Erreur lors de l'envoi de l'email: ${response.status}`);
})
.then(data => {
    console.log("Email envoyé avec succès!");
})
.catch(error => {
    console.error(error);
});
<?php

$api_url = "https://api.sweego.io/send";
$api_key = "votre_clé_API";
$email_data = [
    "channel" => "email",
    "provider" => "sweego",
    "recipients" => [
        ["email" => "destinataire@example.com"]
    ],
    "from" => [
        "name" => "MY NAME",
        "email" => "votre_email@example.com"
    ],
    "subject" => "Email subject",
    "message-txt" => "Email body"
];

$headers = [
    "Api-Key: $api_key",
    "Content-Type: application/json"
];

$ch = curl_init($api_url);
curl_setopt($ch, CURLOPT_POST, 1);
curl_setopt($ch, CURLOPT_POSTFIELDS, json_encode($email_data));
curl_setopt($ch, CURLOPT_HTTPHEADER, $headers);
curl_setopt($ch, CURLOPT_RETURNTRANSFER, true);

$response = curl_exec($ch);
$http_code = curl_getinfo($ch, CURLINFO_HTTP_CODE);
curl_close($ch);

if ($http_code == 200) {
    echo "Email envoyé avec succès!";
} else {
    echo "Erreur lors de l'envoi de l'email: $http_code";
}

?>
The API returns a structured response indicating whether the message was accepted for delivery.
Using Dynamic Data in Transactional Emails
Transactional emails often require dynamic content, such as user names, reset links, or order details.
Sweego supports variables that can be injected into templates, allowing you to:
- Reuse email templates
- Personalize content per recipient
- Keep your application logic clean
This approach is particularly useful when sending large volumes of transactional emails.
Handling Delivery Events and Errors
Once an email is sent, it is important to track what happens next.
Sweego provides webhooks that notify your application about:
- Successful delivery
- Temporary deferrals
- Permanent failures (bounces)
By consuming these events, you can update your application state, retry when necessary, or alert users in case of issues.
Sending Transactional Emails via SMTP
If your application already relies on SMTP, Sweego can also be used as an SMTP relay.
This option is often preferred for:
- Legacy applications
- CMS or frameworks with built-in SMTP support
- Quick migrations from another provider
The same deliverability and monitoring features apply, regardless of the integration method.
Best Practices for Transactional Email Delivery
To ensure reliable delivery of transactional emails:
- Use a dedicated sending domain
- Configure SPF, DKIM, and DMARC correctly
- Keep transactional traffic separate from marketing emails
- Monitor bounces and delivery rates regularly
These practices help maintain a strong sender reputation over time.
Conclusion
Sending transactional emails through an API gives you full control over reliability, monitoring, and scalability.
By integrating Sweego’s API, developers can implement a robust transactional email system that fits both modern applications and existing infrastructures.
For more details on advanced features and API parameters, refer to the complete Sweego API documentation.